Judging & Presentation Tips
What to expect from judging day and how to prepare to give an amazing presentation!
Criteria and process
As a CWSF finalist, you will have the opportunity to present your project to a group of judges who will evaluate your work based on the CWSF Judging Rubric. Judging takes place on Monday and Tuesday of the CWSF week and is a crucial part of the experience. On judging days, only ambassadors, finalists, and judges are allowed in the Project Zone.
To summarize:
- Before the fair: As part of the CWSF registration process, finalists will self-nominate for up to three Special Awards. Before the CWSF, expert judges will review the nominations to confirm their eligibility for each Special Award. Finalists will be notified before CWSF if their project is not eligible for a Special Award they nominated themselves for. It’s important to note that this review does not consider the quality of your project, only your eligibility for the Special Awards.
- Monday judging: The first judging day is entirely devoted to Excellence Awards judging, and these judging sessions are all scheduled. You will be given your judging schedule ahead of time and it’s important not to miss one! These sessions are 20 minutes long, and you should prepare to take about 7 minutes to present your project to members of a multi-disciplinary judging team, with the remaining time dedicated to questions and further conversation. One or two members of the judging team will be knowledgeable in your field, the others will have a strong STEM background that may be outside your field. This structure helps to evaluate your ability to communicate your work to both expert and non-expert STEM professionals.
- Tuesday judging: On day 2, your judging sessions are only 10 minutes in length and might be both scheduled and unscheduled. Any scheduled judging times will be related to Special Awards, so not every finalist will receive a schedule for day 2. Unscheduled judging also occurs on Tuesday and is a continuation of Excellence Award judging. As much as possible, try to stay near your project on Tuesday and let someone know if you’re stepping away so they tell any judges who stop by.
Note on Feedback from Judges: Please be aware that due to the structure of the competition and the number of finalists and projects, our judges are not able to provide personalized or individual feedback to finalists during or after the Canada-Wide Science Fair. This policy ensures fairness and impartiality in the judging process. We appreciate your understanding and encourage you to engage in discussions and learning experiences with peers and mentors to improve your research or innovation and project presentation.
Crafting your presentation
Delivering a compelling presentation is crucial to your success at the Canada-Wide Science Fair. It’s your opportunity to showcase the hard work, research, and creativity that went into your project. Here are some guidelines and tips to help you craft a presentation that captivates your audience, communicates your findings effectively, and leaves a lasting impression on the judges and attendees.
- Be prepared: Don’t memorize it, but practice! – You might be tempted to write your presentation on cue cards or practice it over and over like lines for a play. But the best judging presentations are like conversations – they flow back and forth between the finalist(s) sharing information and the judge asking questions. Identify the key highlights of your project, prepare answers to some possible questions you might get asked, and remember to speak directly with the judge rather than just reading off your poster. Extra tip: Practice having conversations about your project with friends and family to get comfortable with people asking questions during your presentation.
- Be engaging: Your presentation should be engaging and interactive and showcase your passion and enthusiasm for STEM. Use examples, anecdotes, and stories to illustrate your points and make your presentation memorable. Start with an introduction that captures the judges’ attention and outlines the purpose and scope of your project. Speak clearly and steadily while you paint a picture of the problem you were trying to solve or the issue you investigated – remember to say why it is important (to them as an individual, to your community, to the world)!
- Don’t worry if you don’t know the answer to a question – This happens to everyone! Judges want to understand what you know and the depth of your knowledge. They may ask increasingly more challenging questions to find the limit of your understanding because this helps them evaluate your work and what you learned. Answer with the information you know (e.g. “My understanding is…”), openly admit if you don’t know (e.g. “I didn’t look at that for my project, so I am not sure.”), and honestly talk about the next steps for your project (e.g. “While that is outside of the scope of my project, I would be interested in looking into that further as part of my next steps.”). And you can always ask a judge to re-ask the question if you need clarification.
- Remember: You know your project better than anyone! – While it can be hard to talk with experts in STEM about your project, you are the one who knows the most about your specific project. You came up with the idea, mapped out how you would do it, worked through all the steps, made observations, and tracked your results. Be confident in your work, be honest about your challenges (STEM is full of trial and error – this is a good thing!) and be excited to share your discovery or innovation. You’ve got this!
- Extra tip for both judging days & public viewing days: Know your audience – Not everyone who comes by your project will have time or want to engage in a long conversation about your project. A good rule of thumb is 30 seconds, 3 minutes, 10-20 minutes, which looks like:
- You should be able to sum up your project, results, and its importance to anyone in 30 seconds (also called an “elevator pitch”). If they seem interested or ask more questions, expand your conversation to other important highlights, covering roughly 3 minutes. This is not a set amount of time you need to practice; it is just an estimate to keep in mind. Finally, if you are being judged, that is when you will want to share the most detail and focus on telling the full story of your project. Judging sessions could be 10-20 minutes, depending on the day, but you should be prepared to treat it like a conversation with questions throughout (not a memorized script!). Start with your key points and let the following questions and answers flow naturally in conversation with the judges.
- Most importantly, have fun! – You’ve poured hard work and long hours into this project, so this is your chance to share the story of your efforts and your genuine passion for your project. You deserve to have fun, and by doing so, your enthusiasm for your project will naturally shine through!
Visual aids and materials
Creating an engaging and informative project display is crucial for effectively communicating your research and findings at CWSF. Here’s what you need to know to prepare your project display, keeping in mind the provided equipment and guidelines for a successful presentation.
The CWSF Display Unit
Each finalist will be provided with a standard CWSF display unit for their project presentation. This unit is designed to showcase your work professionally and includes the following components:
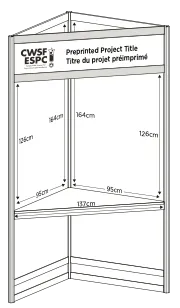
- Preprinted Title: A header board with your project number, title and region preprinted by YSC, ensuring a uniform and clear identification for each project.
- Two Poster Panels: These panels are the primary space for your posters. You can bring printed pages or create two posters that fit within the space on these panels. While an exact fit is not strictly required, your posters should be sized appropriately to be aesthetically pleasing and easy to read. Refer to the Project Resources section above for more information on designing an effective poster.
- Note: Tape is provided to all finalists for attaching their posters to the backboard. Please do not bring your own tape or thumbtacks/pins.
- Small Shelf for Display Items: A shelf is included for any physical display items you wish to include as part of your presentation. Be mindful of the space and note that it is only intended for items as heavy as a laptop and booklets.
Project Display Considerations
- Safety and Regulations: Ensure your display adheres to all safety guidelines and regulations. Prohibited items include any live specimens, hazardous materials, or anything that could pose a risk to attendees. Refer to the CWSF Project Displays policy for more information.
- Academic Integrity: Make sure that anything you include as part of your project – either on ProjectBoard or on your poster – is properly cited. Learn more with our Academic Integrity policy.
- Securing Valuables: The Project Zone is secured at night to protect your display and equipment. However, it’s wise to take any valuable items, such as personal electronics or sensitive materials, to your room for safekeeping.
Designing Your Project Poster
Youth Science Canada has developed resources to assist you in creating your project poster. These resources are available to CWSF finalists in the YSC Portal. After signing in, navigate to “Support Centre” to access the resources.
- CWSF PowerPoint & Canva Poster Templates & Supporting Video: A compelling poster is essential for presenting your project effectively. The CWSF PowerPoint and Canva Poster Templates provide a professionally designed layout that you can customize with your project information, ensuring your presentation catches the eye of judges and attendees. In collaboration with Mike Morrison, PhD, there is also a video explaining the science behind this poster template.
- Three CWSF Poster Template Samples: To give you inspiration and ideas for designing your poster, YSC provides three sample templates that demonstrate effective poster layouts and design principles. These samples can help you decide how best to communicate your research visually.
Note: Your poster doesn’t have to exactly match the dimensions of the backboard – it just has to fit within this space. You will notice the Canva poster templates come in multiple sizes – one is the exact backboard size and the other is a normal print size (which will be cheaper to print and can be done at any print shop!).